
Sealcoating
Asphalt sealcoating is a process that is designed to keep asphalt surfaces water-tight and protected from the elements. Think of sealcoating as a protective “paint” that goes over the surface of a driveway or parking lot, giving it a jet black hue while also keeping the asphalt in tip top shape.
Asphalt is just a bunch of rocks that are glued together with a petroleum-based binder under a high heat. When installed and compacted, asphalt surfaces give the appearance of being smooth, impenetrable surface. However, micro-pores exist between each individual rock that makes up the asphalt mix, allowing moisture to find it’s way through the asphalt layers. In a sense, you could say that asphalt is porous.
Water, being one of the most destructive forces on planet earth, is not something that we want to consistently penetrate asphalt. With moisture in the asphalt layers and in the sub-base underneath, the asphalt is susceptible to damage, especially during the winter months when the ground freezes and thaws. Water expands and contracts as it heats up and cools down and the last thing we want to have happen is for the moisture sitting in the micro-pores of the asphalt to undergo this expansion and contraction.
The fix? We need to allow as little moisture as possible to penetrate the asphalt layers in the first place. This is where sealcoating comes into play. When asphalt gets sealcoated, the sealer fills up the micro-pores in the asphalt and allows water that hits the surface to “shed” versus get absorbed. Again, the goal is to have as much water shed off the surface of the driveway or parking lot as possible to reduce the amount of moisture in the asphalt layers.
Methods Of Application
There are a few different methods of applying sealer to an asphalt surface, but the two most common ways are 1.) brush/squeegee and 2.) spray wand. But before we take a closer look at the two, lets quickly cover the prep work that is involved in readying the asphalt surface to ensure that it is clean and able to accept the sealer.
Prep Work
- First, the asphalt surface must be cleaned of all dirt and debris. Though asphalt may look relatively clean, there is always dirt that can be lodged in the micro-pores that we discussed above. Most of the time, there is leaves, grass clippings, loose rocks, mulch, and a plethora of other forms of debris that are sitting on the surface. Through using a combination of wire-bristle brooms and high-speed walk-behind blowers, we make the asphalt surface as clean as is possible. By scrubbing affected areas with good old elbow grease, the wire bristles on the broom loosen up dirt that has been caked in the micro-pores of the asphalt. The powerful walk-behind blowers then come in and blow all of the topical debris and loosened dirt off the surface of the asphalt. We now have a “clean canvas” to work on.
- Next, any large cracking that is visible needs to be filled with crackfiller. There are two main types of crackfiller: cold-applied and hot-applied. Cold-applied crackfiller comes in jugs and is the temperature of the air around it. The jug has a conical tip that is held over the crack and when the jug gets squeezed the crackfiller gets dispensed into the crack. Hot-applied crackfiller is a new beast entirely. It starts as blocks of solid rubber (it’s more nuanced than that but we’ll stick with rubber for now) that get melted down in a propane-fired and/or oil-jacketed kettle at a temperature of 350°F-400°F. The now-liquid rubberized material gets dispensed from the kettle into a pour pot, which then transfers the material to the cracks on the asphalt surface. When you are driving down the road and you see the black squiggly lines dotting the surface, that is DOT-approved hot-applied crack filler. Because of its rubbery characteristics, the material can flex, expand, and contract with the moving of the ground during freeze/thaw cycles, ultimately keeping the crack from expanding more. Both cold-applied and hot-applied crackfillers are followed up with a V-squeegee to smooth/flatten the head of material, and also to work the material into the crack itself. The exception to the V-squeegee is if the material is dispensed via a wand on an oil-jacketed machine, which smooths the head of material as it is applied. This is more commonly used on roadways and commercial parking lots.
- Additionally, oil spots need to be primed. It’s very common on asphalt surfaces to see spots where gasoline and oil has dripped from cars, motorcycles, lawnmowers, etc. As well as looking ugly, these spills have a tendency to to “eat away” at the asphalt surface, causing the aggregates in the asphalt mix to unravel and create pock marks. Not only this, but oil spots will reject an application of sealer since there is water in the sealcoating mixture (more on this below). As we all know, water and oil don’t get along.To solve this, we coat the oil spots with a primer. First, it stops the spills from eating away at the asphalt, which is very important for those affected areas. Second, it allows the surface of the asphalt that contains the oil spill to accept a coating of sealer.
Now that the prep work has been completed, it’s time to apply the sealer.
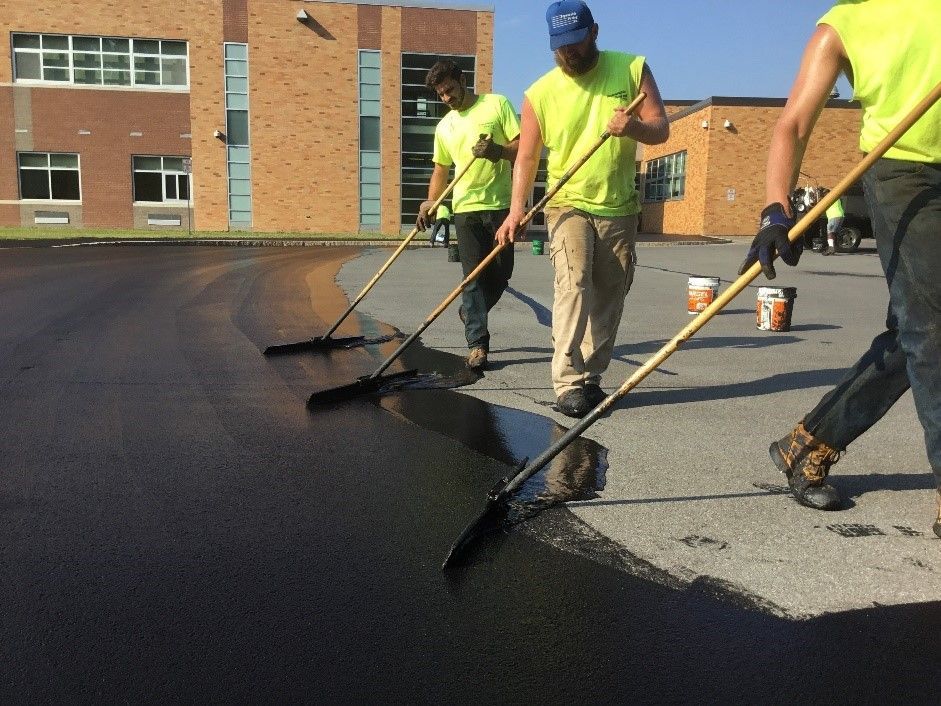
Brush/Squeegee
Also known as “hand applied,” this method of applying sealer to an asphalt surface is seen as the classic way of sealcoating. When a company is going to sealcoat your driveway or parking lot, they will perform their prep work while the mixture in their tank is agitating to keep the sand and additives suspended (more on that below).
Once the prep work is done they will start to apply the sealer via 5-gallon buckets. The material gets dispensed into the 5-gallon buckets via a spigot on the tank and the buckets are carried to the starting point of the job. For residential driveways, this starting pint is most commonly where the driveway meets the garage. The sealer then gets carefully poured out of the buckets and onto the surface of the asphalt, where the asphalt immediately starts to absorb the sealer. A skilled worker will then take a bristled brush or squeegee and start to work the sealer over the surface of the asphalt, making sure that it does not get on anything but the asphalt itself. The material will get worked from edge to edge of the asphalt surface with more sealer being dispensed from the 5-gallon buckets as needed until the entire surface is neatly covered.
The beauty about this method is multi-fold. First off, as the sealer is sitting on the asphalt surface after being dispensed from the buckets, the asphalt is absorbing all the sealer that it can take. As the brush or squeegee then comes by it whisks away the excess while simultaneously working the sealer into the pores of the asphalt. You get much better absorption rates with this method, with tests showing a 30% increase in the amount of material used as opposed to a spray application. Second, applying sealer by hand is much neater. The goal of applying sealer is to get it on the asphalt surface and nothing else. We don’t want it splashed on garage doors, siding, sidewalks, landscaping, or whatever other surfaces may be near your driveway. Once it dries on other surfaces it’s extremely difficult to get off and sometimes it never will. By applying sealer by hand, the skilled craftsmen has ultimate control over where the sealer goes and is not at the mercy of the wind or surface-rebound produced by the force of a spray wand.
Spray Wand
One might ask “why then, if hand application is superior in absorption rates and cleanliness, would anyone use a spray wand?” Because its quicker and easier of course! When sealer is applied by hand, the installers undergo much more laborious work. They need to lug the buckets to where the sealer is needed, manually pour the sealer onto the surface of the asphalt, and manually push the sealer across the entire surface for the entirety of the job.
With a spray wand, the material is pumped through a hose from the tank on the truck to where it is needed, extinguishing the need for buckets. The material is then ejected from a spray tip at the end of the hose, eliminating the need for it to be poured out onto the ground. The sealer that is ejected from the spray tip is in the form of a “mist” so that it coats the ground, similar to how spray paint would be ejected from a can. This form of ejection from the spray tip eliminates the need for the sealer to be pushed across the surface with a broom or squeegee.
Through this method, large areas of asphalt surfaces can be covered quickly with much less labor-intensive work, making it the leading choice for many installers. However, it does have its downfalls. Since the sealer isn’t getting poured out on to the surface of the asphalt and sitting there until the brush an comes along to whisk it away, the asphalt isn’t absorbing nearly as much sealer as it would via a hand applied method. Also, nothing is working the sealer into the pores of the asphalt like the bristles on a brush would, it’s just getting a topical coating instead. This is why spray applications use about 30% less sealer than hand applications and often need multiple coats to do the job of one hand applied coat. On top of this, its pretty common to see less sand added to the sealcoat mix than a hand applied mix would have, since too much sand will clog the spray tips at the end of the wand. Lastly, the mist of sealer being ejected from the wand is subject to being carried from wind gusts and onto surfaces that the sealer isn’t meant to be on (cars, buildings, curbing, sidewalks, landscaping, etc). On top this, the speed at which the sealer hits the surface of the asphalt from being forcefully ejected from the spray tip causes the sealer to “bounce” and create more of a potential mess.
At Dependable Paving, we believe solely in hand applying our sealer. Whether it’s a small driveway or large commercial parking lot, our sealer will always be applied the good old fashioned way: by hand.
What’s In The Mix?
Unlike humans, not all sealer is created equal. Not by a long shot. Most sealer starts the same when it’s in its bulk phase at the factory that’s producing it. This bulk sealer is more like a sludge than it is a sealer, and it gets shipped in tankers to bulk distributors around the state. Every sealcoating company needs to get their supply of bulk sealer so that they can make their own sealcoating mix and proceed to install the jobs that they’ve sold. Each mix should contain 3 more ingredients in addition to the bulk sealer: water, sand, and additives. The addition (or non-addition in some cases) of these three ingredients is where sealcoating mixes starts to wildly differentiate themselves.
Water
When a sealcoating company needs to fill their personal tanks up with sealer, they pull into a bulk distribution site and ask for x-amount of bulk sealer to be pumped into their tanks. However, bulk sealer is not ready to be laid down on an asphalt surface in its bulk state – it needs to be cut with water first. Most engineers that design bulk sealer say an optimal percentage of water in the overall sealcoating mix is 30%. In other words, for every 100 gallons of bulk sealer that gets pumped into a sealcoating tank, 30 gallons of water mixed into it for optimal utility.
Sand
Along with the addition of water into the bulk sealer, sand needs to be added into the mix to provide a couple characteristics that sand-less sealer won’t provide. First, nothing has as much traction as “naked” asphalt – that is asphalt which has never been sealed. Sealcoating, unfortunately, reduces some of the traction that asphalt has, which is a major reason why roadways aren’t sealed. To help retain some of the traction, however, sand is added to the mix at a rate of 2-4 pounds per gallon of bulk sealer that has been pumped into the tank. This not only helps tire traction, but also reduces the possibility of slip/falls during the winter months. Second, the sand in the mix helps to strengthen the sealer and fill in hairline cracking that may exist on the surface of the asphalt. Sand is a very important ingredient in the overall sealcoating mix and should not be overlooked.
Additives
Lastly, there are additives that can be added to a sealcoating mix that help to further strengthen the mix and cure from the bottom up. One popular additive in the industry and that we personally use here at Dependable Paving is Targel Plus. This is a rubberized polymer additive that suspends and locks in sand for better dispersion, toughens and rubberizes the sealer for added strength and flexibility, helps to improve gas, fuel, and oil resistance, and aids in reducing scuffing and power steering marks on the asphalt surface. A second additive that goes into our mix is Fass-Dri. This is an additive that has Nano-Cure technology, allowing the sealer to cure from the bottom up versus the top down. It also has sand-suspension properties and dries to a very black finish.
As a distributor of bulk sealer, we at Dependable Paving by default get to see how other companies make their sealcoating mixes, and the outcomes vary from company to company. We see some companies that do everything by the book: they cut the bulk sealer with the proper amount of water, they add sand to the recommended amount, and they blend in the strengthening and drying additives. These companies, unfortunately, are far and few between. Most commonly, we see companies water down their mix by 40, 50, and sometimes 60% of the bulk sealer that was pumped into their tank. Companies that do this are not going to incur the extra costs involved with mixing in sand or additives either. To that same point, there are other companies out there that don’t over-water their mix, but also don’t want to incur the costs of sand or additives either, hoping that their buck will stretch further. Some companies, if they are applying the sealer via spray wand, have to increase the water in their mix and reduce the sand ratio drastically so that the tips of their spray wands don’t clog up.
This is all mentioned to highlight the fact that it is up to each individual sealcoating company to make their own “house mix” in a way that will fit their business model. It’s also mentioned because the average property owner who isn’t learned in the sealcoating industry may just assume that sealer is sealer and at the end of the day it’s all the same, right? They may be gathering multiple quotes from different companies and not understand why there can be such drastic price differences from one bid to another.